現状・条件
Django 開発サーバ ( Runserver ) を HTTPS 化 するなら、▼ の記事をご覧ください。
以下は、example.com と example2.com の SSL 証明書が必要です。事前に取得および設定を行ってください。
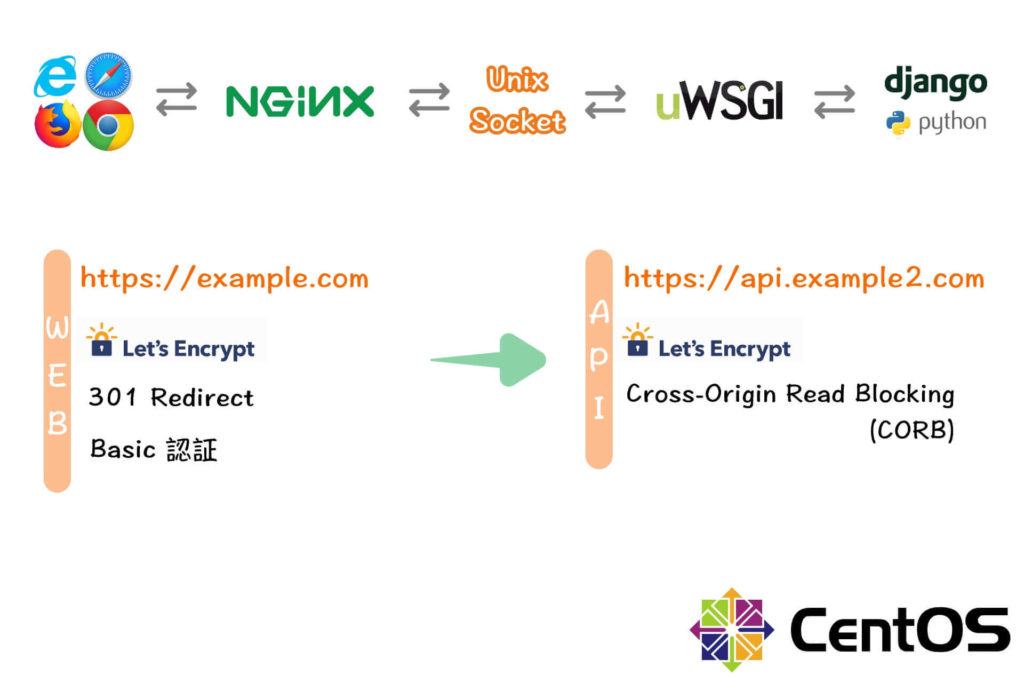
Nginx WEB サーバを設定する
SSL / HTTPS
SSL 証明書の取得および設定をしておく必要があります。これからの方は Let’s Encrypt ワイルドカード証明書を取得・自動更新を完結する|DNS-RFC2136 記事をご覧ください。
SSL 証明書の設定を完了した後、下記のように Nginx の設定ファイルを編集します。( ファイル名は任意 )
server { … } ブロックのリッスンソケットで ssl パラメーターを有効 ( listen 443 ssl; ) にし、サーバー証明書 ( ssl_certificate ) と秘密キーファイル ( ssl_certificate_key ) の場所を指定する必要があります。
ここでは Let’s Encrypt 証明書ファイルを指定します。
[admin@centos7 ~]$ sudo vi /etc/nginx/conf.d/default_nginx.conf
...
server {
    listen              443 ssl;
    server_name         www.example.com example.com;
    ssl_certificate     /etc/letsencrypt/live/example.com/cert.pem;
    ssl_certificate_key /etc/letsencrypt/live/example.com/privkey.pem;
    ssl_protocols       TLSv1 TLSv1.1 TLSv1.2;
    ssl_ciphers         HIGH:!aNULL:!MD5;
}
...
301 Redirect
server { … } ブロックの中に return 301 https://$host$request_uri; を追加して完了です。( 全てのリクエストを HTTPS 化します )
server {
    listen 80;
    server_name www.example.com example.com;

    # 301 Redirect
    return 301 https://$host$request_uri;
}
server {
    listen              443 ssl;
    server_name         www.example.com example.com;
...
※ Apache の 301 Redirect 設定は Apache の名前ベースのバーチャルホスト設定で https への 301リダイレクトを設定 | CentOS 7 記事をご参照ください。
設定を終えたら、Nginx を再起動する
# Syntax を確認します。
[admin@centos7 ~]$ sudo nginx -t
nginx: the configuration file /etc/nginx/nginx.conf syntax is ok
nginx: configuration file /etc/nginx/nginx.conf test is successful
[admin@centos7 ~]$

# OK であれば、リロードします。
[admin@centos7 ~]$ sudo systemctl restart nginx
ブラウザで確認する
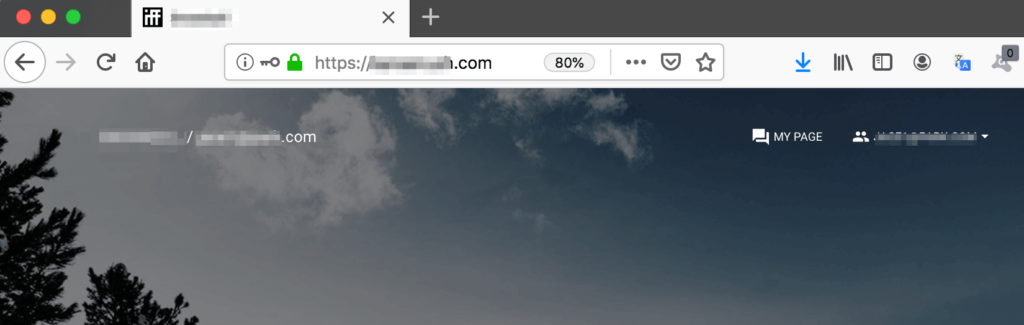
https://〜でアクセスできれば OK です。
HTTP Basic 認証
設定するには、パスワードファイル生成ツール( Password file creation utility )httpd-tools が必要です。
httpd-tools は yum install httpd コマンドを実行する際、依存パッケージとして自動インストールされますが、もし Apache を設置していなければ yum install httpd-tools コマンドでインストールしておきましょう。
パスワードファイルを作成する
htpasswd コマンドを使用して、最初のパスワードファイルとユーザを作ります。
-c フラグ で新しいファイルが生成されます。
ファイルパスは任意です。ここではマルチドメイン環境を顧慮し、example.com のドキュメントルートの下に作成します。
[admin@centos7 ~]$ sudo htpasswd -c /usr/share/nginx/html/example.com/.htpasswd user1
New password: <パスワードを入力>
Re-type new password:<再度入力>
Adding password for user user1
[admin@centos7 ~]$
-c フラグを付けると、既存のパスワードファイルが削除 → 新しいファイルが生成されるため、既存のユーザ設定がリセットされます。
パスワードファイルを確認する
[admin@centos7 ~]$ cat /usr/share/nginx/html/example.com/.htpasswd
user1:$apr1$toVEMA.P$83scrofB6oMkdCK5lzT2P0
[admin@centos7 ~]$
Nginx を設定する
認証を掛けたい場所を事前に決めておきます。
ここでは example.com のルートディレクトリ ( / ) に Basic 認証を掛けます。
auth_basic とauth_basic_user_file ( 場所は任意 ) を設定します。先ほど生成したファイルを指定します。
...
location / {
    root   /usr/share/nginx/html/example.com;
    index  index.html index.htm;

    # Basic認証
    auth_basic "Restricted";
    auth_basic_user_file  /usr/share/nginx/html/example.com/.htpasswd;
    }
...
設定を終えたら、Nginx を再起動する
# Syntax を確認します。
[admin@centos7 ~]$ sudo nginx -t
nginx: the configuration file /etc/nginx/nginx.conf syntax is ok
nginx: configuration file /etc/nginx/nginx.conf test is successful
[admin@centos7 ~]$

# OK であれば、リロードします。
[admin@centos7 ~]$ sudo systemctl restart nginx
ブラウザで確認する
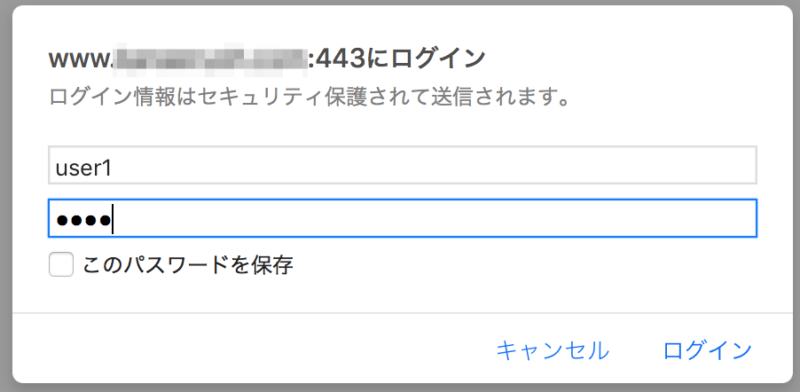
https://example.com へアクセスすると、下記のウィンドウが表示されログインできれば OK です。
Conf ファイルの最終版
コピペ可能です。ドメイン名や PATH などを適宜変更してご使用ください。( Conf ファイル名は任意 )
[admin@centos7 conf.d]$ sudo vi default_nginx.conf

server {
    listen 80;
    server_name www.example.com example.com;

    # 301 Redirect
    return 301 https://$host$request_uri;
}

server {
    listen              443 ssl;
    server_name         www.example.com example.com;
    ssl_certificate     /etc/letsencrypt/live/example.com/cert.pem;
    ssl_certificate_key /etc/letsencrypt/live/example.com/privkey.pem;
    ssl_protocols       TLSv1 TLSv1.1 TLSv1.2;
    ssl_ciphers         HIGH:!aNULL:!MD5;

    charset utf-8;

    # max upload size
    client_max_body_size 75M;

    access_log  /var/log/nginx/access.log  main;
    location = favicon.ico { access_log off; log_not_found off; }

    location / {
        root   /usr/share/nginx/html/example.com;
        index  index.html index.htm;

    # Basic認証
    auth_basic "Restricted";
    auth_basic_user_file  /usr/share/nginx/html/example.com/.htpasswd;
    }

    # redirect server error pages to the static page /50x.html
    error_page   500 502 503 504  /50x.html;
    location = /50x.html {
        root   /usr/share/nginx/html;
    }
}
Django REST framework API サーバを設定する
SSL / HTTPS
WEB サーバと同じく、サーバーブロックのリッスンソケットでsslパラメーターを有効 ( listen 443 ssl; ) にし、サーバー証明書 ( ssl_certificate ) と秘密キーファイル ( ssl_certificate_key ) の場所を指定する必要があります。
ここでは Let’s Encrypt 証明書ファイルを指定します。
upstream django {
    server unix:/run/uwsgi/snowball.sock;
    #server 127.0.0.1:8001;
}

server {
    listen              443 ssl;
    server_name         api.example2.com;
    ssl_certificate     /etc/letsencrypt/live/example2.com/cert.pem;
    ssl_certificate_key /etc/letsencrypt/live/example2.com/privkey.pem;
    ssl_protocols       TLSv1 TLSv1.1 TLSv1.2;
    ssl_ciphers         HIGH:!aNULL:!MD5;
Cross-Origin Read Blocking ( CORB ) に対処
example.com から API サーバへ のクエリやリクエストが来るので、CORB 対策 はここ ( API サーバ側 ) で行います。
動作を確認するには、実際に API サーバと WEB サーバが連動されて正しく動作する必要があります。それでは、エラーの例から見ていきます。
xhr.js:155 Cross-Origin Read Blocking (CORB) blocked cross-origin response https://api.example2.com/surveys/?publish_results=true with MIME type application/json. See https://www.chromestatus.com/feature/5629709824032768 for more details.
—-
Access to XMLHttpRequest at ‘https://api.example2.com/rest-auth/login/’ from origin ‘https://example.com’ has been blocked by CORS policy: Response to preflight request doesn’t pass access control check: The ‘Access-Control-Allow-Origin’ header contains multiple values ‘https://www.example.com, https://example.com’, but only one is allowed.
—-
Access to XMLHttpRequest at ‘https://api.example2.com/users/me/’ from origin ‘https://example.com’ has been blocked by CORS policy: Response to preflight request doesn’t pass access control check: The ‘Access-Control-Allow-Origin’ header has a value ‘https://www.example.com’ that is not equal to the supplied origin.
—-
Access to XMLHttpRequest at ‘https://api.example2.com/users/me/’ from origin ‘https://example.com’ has been blocked by CORS policy: Request header field access-control-allow-origin is not allowed by Access-Control-Allow-Headers in preflight response.
—-
例4まで設定すると問題が解消されます!
↑の4つのエラーをクリアした設定が下記です。
add_header を使い、if ($request_method = ‘OPTIONS’) { … } の中に下記のように設定します。
...
    location / {
        root /reactjs/snowball/backend;
        include /etc/nginx/uwsgi_params;
        uwsgi_pass django;
        autoindex on;

        if ($request_method = 'OPTIONS') {
            add_header 'Access-Control-Allow-Origin' '*';
            add_header 'Access-Control-Allow-Methods' 'GET, POST, PUT, PATCH, DELETE, HEAD';
            add_header 'Access-Control-Allow-Headers' 'Origin, x-requested-with, Authorization, Accept, Content-Type';
            add_header 'Access-Control-Max-Age' 86400;

            return 204;
        }
    }
...
※ PATCH を追記!( 2019/12/03 ) ▲
add_header ‘Access-Control-Allow-Methods’ ‘GET, POST, PUT, PATCH, DELETE, HEAD’;
設定を終えたら、Nginx を再起動する
# Syntax を確認します。
[admin@centos7 ~]$ sudo nginx -t
nginx: the configuration file /etc/nginx/nginx.conf syntax is ok
nginx: configuration file /etc/nginx/nginx.conf test is successful
[admin@centos7 ~]$

# OK であれば、リロードします。
[admin@centos7 ~]$ sudo systemctl restart nginx
ブラウザで確認する
https://example.com へアクセスすると、下記のウィンドウが表示されログインできれば OK です。
Conf ファイルの最終版
コピペ可能です。ドメイン名や PATH などを適宜変更してご使用ください。( Conf ファイル名は任意 )
[admin@centos7 conf.d]$ sudo vi snowball_nginx.conf

upstream django {
    server unix:/run/uwsgi/snowball.sock;
    #server 127.0.0.1:8001;
}

server {
    listen              443 ssl;
    server_name         api.example2.com;
    ssl_certificate /etc/letsencrypt/live/example2.com/cert.pem;
    ssl_certificate_key /etc/letsencrypt/live/example2.com/privkey.pem;
    ssl_protocols       TLSv1 TLSv1.1 TLSv1.2;
    ssl_ciphers         HIGH:!aNULL:!MD5;

    charset utf-8;

    # max upload size
    client_max_body_size 75M;

    location = favicon.ico { access_log off; log_not_found off; }

    location / {
        root /reactjs/snowball/backend;
        include /etc/nginx/uwsgi_params;
        uwsgi_pass django;
        autoindex on;

        # Cross-Origin Read Blocking ( CORB ) に対処
        if ($request_method = 'OPTIONS') {
            add_header 'Access-Control-Allow-Origin' '*';
            add_header 'Access-Control-Allow-Methods' 'GET, POST, PUT, DELETE, HEAD';
            add_header 'Access-Control-Allow-Headers' 'Origin, x-requested-with, Authorization, Accept, Content-Type';
            add_header 'Access-Control-Max-Age' 86400;

            return 204;
        }
    }

    location /media  {
        alias /reactjs/snowball/backend/media;
    }

    location /static {
        alias /reactjs/snowball/backend/static;
    }
}
設定を終えたら、Nginx を再起動する
# Syntax を確認します。
[admin@centos7 ~]$ sudo nginx -t
nginx: the configuration file /etc/nginx/nginx.conf syntax is ok
nginx: configuration file /etc/nginx/nginx.conf test is successful
[admin@centos7 ~]$

# OK であれば、リロードします。
[admin@centos7 ~]$ sudo systemctl restart nginx
ブラウザで確認する
https://example.com へアクセスして該当ページが表示されれば OK です。
開発サーバをHTTPS化するなら、▼ の記事をご覧ください。
※ 2019/12/18 追記:
この記事の環境を構築したら、下記のこともできます。興味のある方はご参考にどうぞ!▼
Permission エラーの無い uWSGI と Nginx で Django API サーバを構築する方法 |CentOS 7
参考文献
Configuring HTTPS servers
Restricting Access with HTTP Basic Authentication
Reason: CORS header ‘Access-Control-Allow-Origin’ missing
WiMAX +5GをはじめるならBIGLOBE
![]()
公式特典!初期工事費実質0円!最大41,250円割引!おトクにauひかりをスタートできる!
![]()
コメント